Regular SDK
Introduction
This page will explain the necessary steps an app developer will have to implement in order to display Outbrain recommendations via a “regular widget” (non-Smartfeed) in their Android app.
Please make sure to follow the Getting Started guidelines before moving forward.
Guidelines and Limitations
The recommendations that Outbrain provides are time-sensitive. Recommendations are intended for specific users at specific times, and any caching or delay in their presentation will have a negative impact on their performance (and the user experience). The following limitations and guidelines must be applied to the Outbrain recommendations’ display:
- Storing/caching recommendations with the intent of delaying their presentation on the page is prohibited.
- Co-mingling of Outbrain recommendations with other content links within the same container is prohibited, unless mutually agreed upon between the client and Outbrain.
- Altering or replacing an Outbrain recommendation’s text or image is prohibited.
- All paid recommendations must be uniquely labeled in a manner that can be reasonably associated with the relevant content, as mutually agreed upon between the client and Outbrain.
Widget Overview
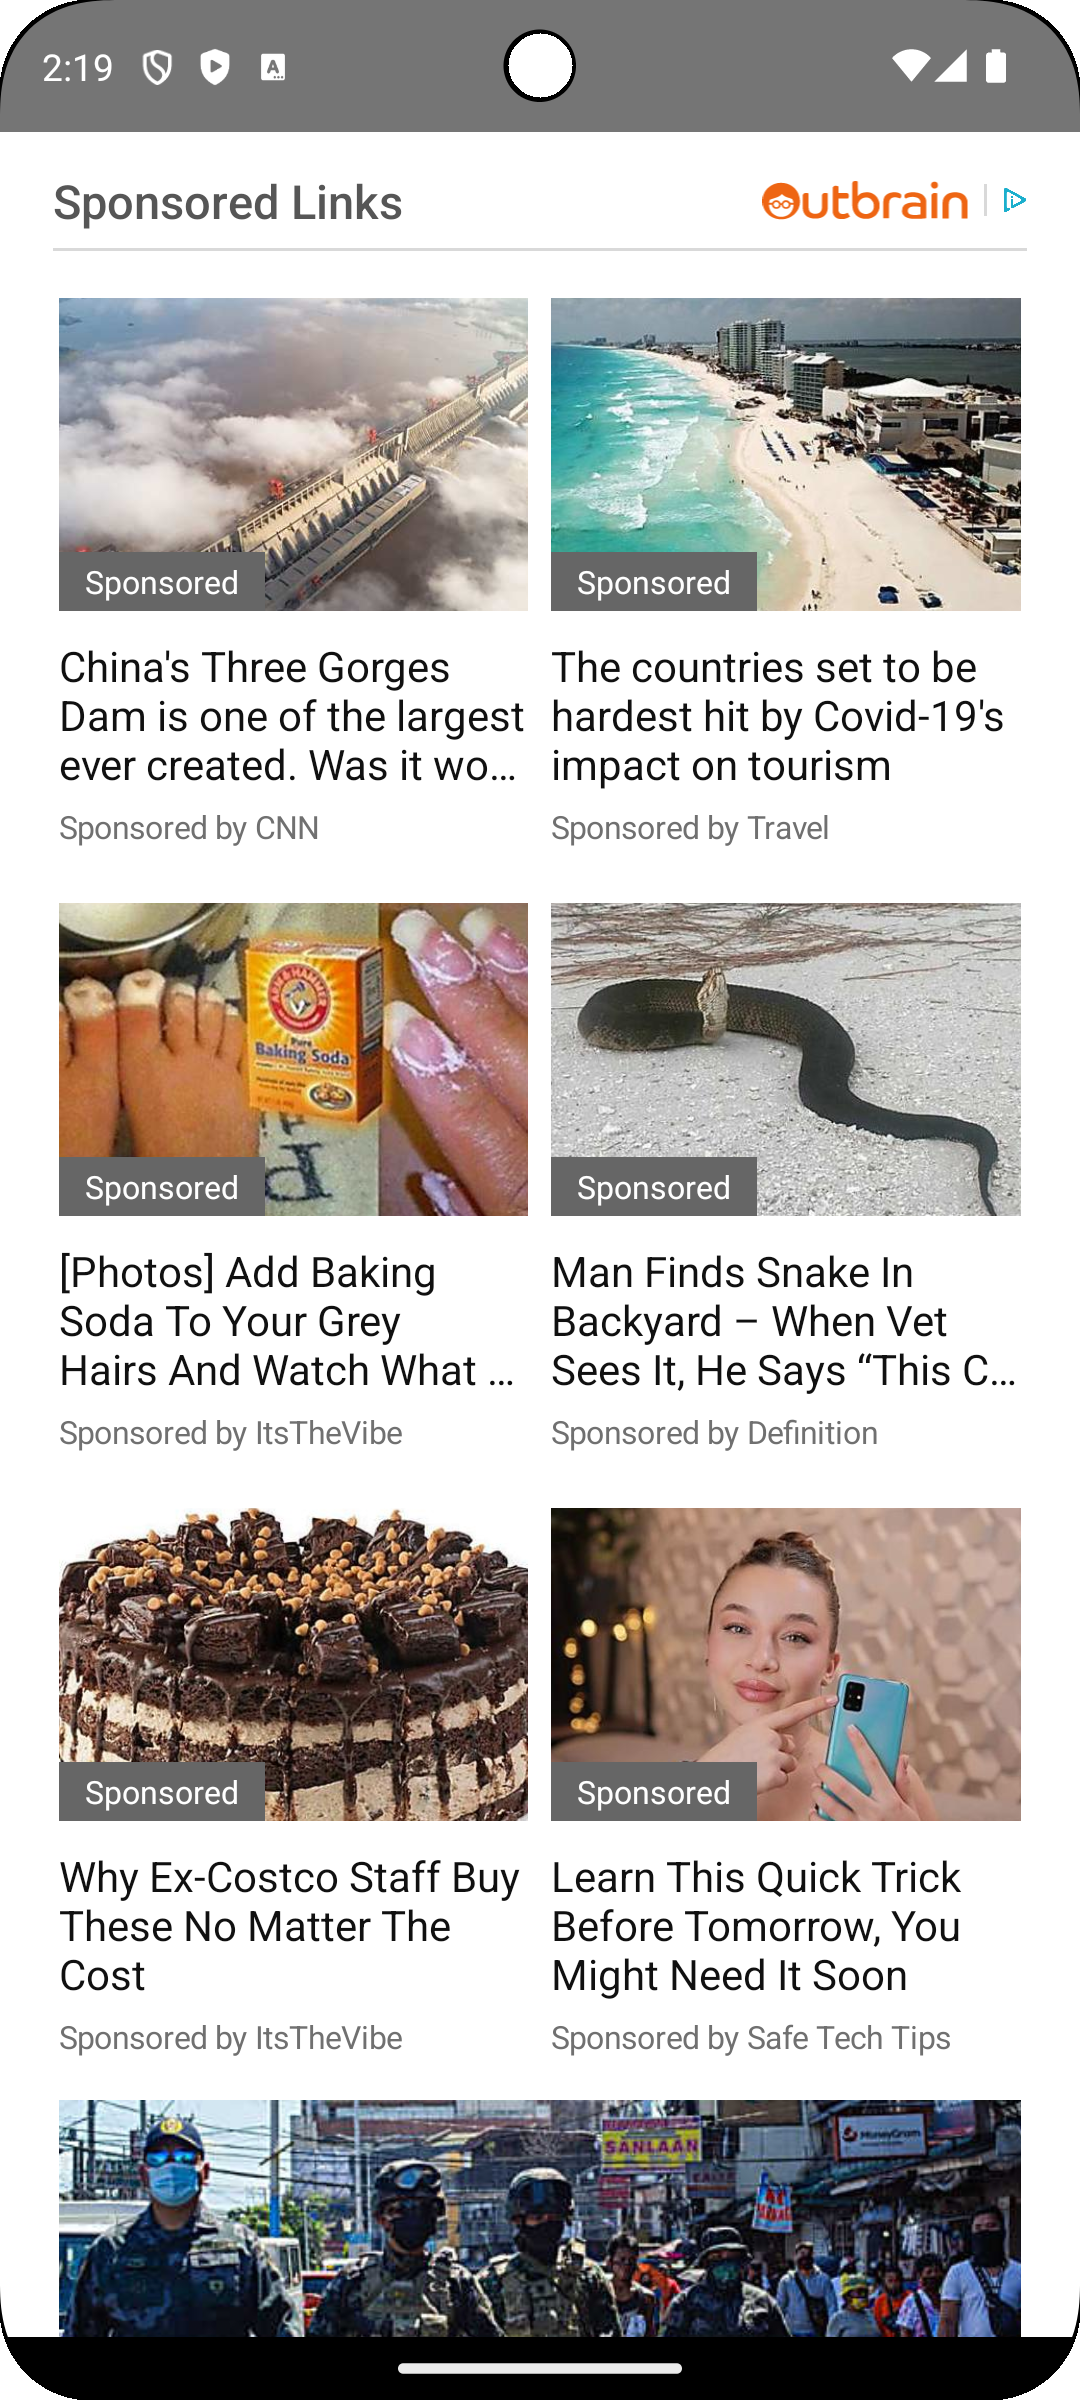
While a user is viewing a page on your mobile app, you can display content recommendations that may be interesting to them. You can recommend both related content within your own app, and 3rd-party content recommendations. You can choose how and when to display the recommendations, whether as a footer, in-feed or other format.
The image below illustrates how a user might view Outbrain recommendations:
The Outbrain Workflow
The Outbrain workflow consists of the following main actions:
- Request content recommendations related to a specific article or app location.
- Receive a list of recommendations
- Display the recommendations on the screen.
- When a user clicks on a recommendation, navigate to the recommendation.
A widget is a UI component, implemented within the app. When you design your app, you decide which widgets will display Outbrain recommendations and respond to clicks on them.
For each widget displaying Outbrain recommendations, you must consult with your Outbrain account manager and decide on a suitable configuration. The configuration refers to settings such as:
- The number of recommendations to be displayed in the widget
- Whether thumbnail images should be displayed for each recommendation
- Whether to recommend articles or videos
Once these settings are determined, your account manager assigns a unique ID for each different widget configuration. This is the value you pass in the widgetId parameter when calling fetchRecommendations().
Add Outbrain SDK Dependency
Please refer to the Getting Started page.
Initializing the Outbrain SDK
The Outbrain Class
The Outbrain class defines a singleton object that is your main interface with the Outbrain SDK. Your app calls its public static methods in order to interact with the Outbrain server. The Outbrain singleton instance is created automatically; you do not need to create it.
Registering Your App’s Key
You will need to register your app’s Outbrain configuration once during the initialization of your app, before calling any other Outbrain method. The register() function takes two parameters:
appContext– your ApplicationContext object.appKey– a string that contains the application key you’ve received from your Outbrain account manager.
Here is an example of how to call Outbrain.register:
try {
    Outbrain.register(appContext, appKey);
}
catch (OutbrainException ex)
{
    // handle exception
}
Working in Test Mode
While you are developing your app and debugging the integration with Outbrain, you must configure the SDK to work in test mode. This prevents Outbrain from performing operational actions such as reporting and billing, for clicks that were not made by your app’s users.
Here is an example:
Outbrain.setTestMode(true); // enable test mode when debugging
During the development and testing phase, call setTestMode during your app’s initialization, but remember to remove this call before submitting your app to the app store.
Simulate Location (Geo)
When in testMode it’s also possible to simulate location in order for Outbrain servers to return recs according to set location. An example use-case for this would be app developers in India trying to simulate recs for UK audience.
Here is an example for setting US location
Outbrain.testLocation("us");
Requesting Recommendations
Calling fetchRecommendations
When you want to request content recommendations, call Outbrain.fetchRecommendations(). Outbrain will send a response containing a list of recommendations, based on the request parameters and the Outbrain configuration.
fetchRecommendations takes two parameters:
request– an instance ofOBRequest, containing the request details (see OBRequest Properties).listener– an instance ofRecommendationsListener, which is a response listener that you must implement to handle the request’s success or failure (See Handling and Displaying Recommendations).
Here is an example of how to call Outbrain.fetchRecommendations:
OBRequest request = new OBRequest(currentUrl, widgetId);

Outbrain.fetchRecommendations(request, new RecommendationsListener() {
    @Override
    public void onOutbrainRecommendationsSuccess(OBRecommendationsResponse recommendations) {
        //Do something with the recommendations (i.e populate UI components)
    }

    @Override
    public void onOutbrainRecommendationsFailure(Exception ex) {
        //Handle failure (write to log, hide the UI component, etc...)
    }
});
Note: Although the fetchRecommendations requests are asynchronous, they are all stored in the same queue, so they are handled in the order in which they were called.
Creating a Recommendation Request
Setting OBRequest Properties
When creating an OBRequest object to provide to fetchRecommendations, set the following properties:
url(mandatory) – the URL of the page for which you’re requesting recommendations. (See Request URL for more details.)widgetId(mandatory) – the widget ID (see Request Widget ID for more details).widgetIndex(optional) – the widget index, required if there is more than one widget on the same app page (see Request Widget Index for more details).
URL Param
There are two types of URLs for which you can request recommendations:
- An article or video page
- A home page or section front
In the case of a home page or section front, please consult with your Outbrain account manager about how to construct the URL.
Widget ID Param
There may be one or more locations in your app where you want to display content recommendations. In addition, you may need to display recommendations in several different widgets on the same page.
Widget IDs are pre-assigned by your account manager, after you define your display requirements for the specific widget. The widget ID maps to settings related to the widget’s display, the number of recommendations returned, etc.
Before using the Outbrain SDK, make sure you have widget IDs assigned to all the widgets in which you’ll need to display recommendations.
Widget Index Param
The widget index is a numeric, zero-based value assigned sequentially to all widgets on the same page. If you plan to use (or already using) more than one widget on a single page on your Mobile app – you’ll have to implement the fetching of the recommendations in a specific order according to the guidelines below:
As a side note, it’s important to note that on Mobile apps there is no “real page”, so the meaning of a “page” in this context is a “screen” or a “page” in which 2 widgets or more are shown to the user.
For example, if you have 3 widgets on a page, you’ll assign the indexes 0, 1 and 2 to these widgets. The widget index is used to differentiate between widgets on the same page, so as not to duplicate recommendations sent to different widgets. Widgets on the same page may be of different types (e.g. footer and drawer), or may be multiple instances of the same type (e.g. multiple in-feed), that should display different recommendations.
External ID param
It’s possible to add “external id” param to OBRequest which will be processed on Outbrain backend and displayed in the dashboard.
OBRequest request = new OBRequest(post.url, "SDK_1");
request.setExternalID("123456789");
Handling and Displaying Recommendations
Handling the OBRecommendationsResponse
After your app calls fetchRecommendations, Outbrain calls your recommendations listener’s onOutbrainRecommendationsSuccess method, while providing an OBRecommendationsResponse object. Using this object, you can iterate over the list of recommendations and display them in your app.
Here is an example of an onOutbrainRecommendationsSuccess implementation:
public void onOutbrainRecommendationsSuccess(
                          final OBRecommendationsResponse recResponse)
{
        int numRecs = recResponse.getAll().size();

        for (int i = 0; i < numRecs; i++)
        {
            OBRecommendation rec = recResponse.get(int index);
            // displaying the recommendation

        }
}
Displaying a Recommendation
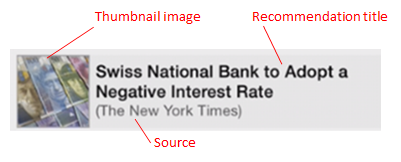
Each OBRecommendation object contained within the OBRecommendationsResponse has the following properties:
content– the recommendation’s title.thumbnail– a thumbnail image (OBThumbnail object) related to the recommendation. This property is optional, and is included only if the widget is configured to display images.sourceName– the name of the recommendation’s source (publisher). For paid recommendations this is the site name, and for organic recommendations this is the section name.isPaid– indicates whether this a paid or organic recommendation.
// Example: displaying a specific recommendation
// getting the recommendation
OBRecommendation rec = recResponse.get(index);
// getting the title
String title = rec.getContent();
// .... populate the relevant UI component with the title

// getting the source
String source = rec.getSourceName();
// .... populate the relevant UI component with the source

// getting image URL
if (rec.getThumbnail() != null) {
   String imageURL = rec.getThumbnail().getUrl();
   // .... populate the relevant UI component with the image
}

// handling paid VS organic recommendation
if (rec.isPaid()) {
   //....Show disclaimer, add paid icon, etc…
}
// handling video VS article
if (rec.isVideo()) {
   //Add video icon on recommendation
}
Displaying Thumbnail Images
The thumbnail image is defined by the OBThumbnail object returned within OBRecommendation. It contains the following properties:
width– the image width in pixelsheight– the image height in pixelsurl– a URL pointing to the image file. Use the URL to render the thumbnail image (see examples in the Outbrain sample apps).
The image width and height values are those agreed upon and determined by the widget ID.
Audience Campaign
Each OBRecommendation object has the following getter:
getAudienceCampaignsLabel – the audience campaigns label. Could be null if not audience campaigns
Ad Choices Compliance
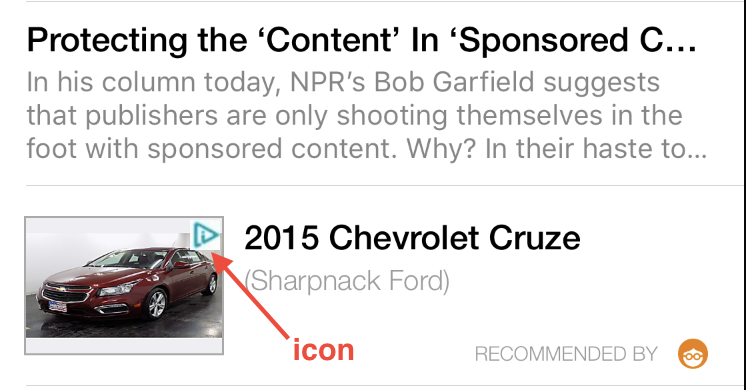
Outbrain serves recommendations from demand partners that requires Ad Choices icon as part of the recommendation creative in order to maximize revenues for the publisher. In order to support more advertising demand paid recommendations must be compliant with the Ad Choices T&C.
In order to be compliant with Ad Choices T&C – Outbrain SDK will do most of the work for you. All you need to is make sure that for each ImageView which displays a paid recommendation image you will do the following steps:
Step 1 – Edit The XML Layout Of The Recommendation ImageView
In the layout XML file – you should encapsulate each ImageView which displays a paid recommendation, within a FrameLayout. The FrameLayout should also contain another ImageView for the “Ad Choices” icon.
See example xml below:
<FrameLayout
    android:id="@+id/outbrain_image_layout"
    android:layout_width="wrap_content"
    android:layout_height="wrap_content">

    <ImageView
        android:id="@+id/outbrain_rec_image_view"
        android:layout_width="80dp"
        android:layout_height="80dp"/>

    <ImageView
        android:id="@+id/outbrain_rec_disclosure_image_view"
        android:layout_width="25dp"
        android:layout_height="25dp"
        android:paddingTop="2.5dp"
        android:paddingRight="2.5dp"
        android:paddingBottom="5dp"
        android:paddingLeft="5dp"
        android:layout_gravity="top|right"/>

</FrameLayout>
Important: Ad Choices (disclosure) ImageView should have width and height of at least 25dp each.
See Example:

Step 2 – Displaying RTB Recommendation With Ad Choices (Disclosure) Icon
In code, at the same method where you will normally set the “image url” (rec.getThumbnail()) on the recommendation ImageView – you should also check if the recommendation is of type RTB and if so, set the Ad Choices icon url.
Following the XML example above, see the example code below:
ImageView disclosureImageView = view.findViewById(R.id.outbrain_rec_disclosure_image_view);
final OBRecommendation rec = getItem(position);
if (rec.isPaid() && rec.shouldDisplayDisclosureIcon()) {
    // Set the RTB disclosure icon image
    Picasso.with(context).load(rec.getDisclosure().getIconUrl()).into(disclosureImageView);
}
Step 3 – Handle Ad Choices (Disclosure) Icon Click
Please note, you should set an OnClickListener on the Ad Choices ImageView. In case of a click on the Ad Choices icon – you should open the url in an external browser (Chrome or Custom Tabs)..
Let’s expand the example above with the example code below:
ImageView disclosureImageView = view.findViewById(R.id.outbrain_rec_disclosure_image_view);
final OBRecommendation rec = getItem(position);
if (rec.isPaid() && rec.shouldDisplayDisclosureIcon()) {
    // Set the RTB disclosure icon image
    Picasso.with(context).load(rec.getDisclosure().getIconUrl()).into(disclosureImageView);
    disclosureImageView.setOnClickListener(new View.OnClickListener() {
       @Override
       public void onClick(View v) {
           CatalogUtils.openURLInBrowser(rec.getDisclosure().getClickUrl(), ctx);
       }
    });
}
Note: Make sure that disclosureImageView visibility is set to GONE for non-RTB recommendations. See example below:
Step 4 – Simulate RTB Recommendations And Verify Your Implementation
In order to make sure you’ve implemented steps 1-3 correctly, run the SDK with:
Outbrain.testRTB(true);
Outbrain.setTestMode(true);
This will promise you will receive RTB recommendations in the response for fetchRecommendations(). Please verify that you see the “ad choices” icon and that a click on the icon is opening in external browser as expected.
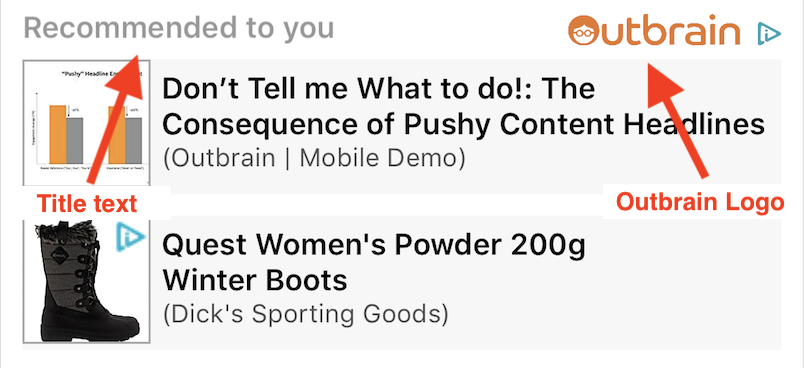
Outbrain Labeling
Any widget displaying Outbrain recommendations must be labeled with a header that is mutually agreed upon between the client and Outbrain. The “Outbrain widget labeling” should also be clickable – a click should open a URL generated by the SDK which is needed for GDPR and Ad Choices compliance.
1) Add the widget title text agreed upon with Outbrain (e.g. “Recommended to you”).
2) Choose one of the Outbrain logo images from the Outbrain-Resources folder.
3) Important: Implement Click Handler
When the user clicks on the Outbrain labeling, you should open a URL generated by the SDK in the following way:
String url = Outbrain.getOutbrainAboutURL(ctx);
openURLInBrowser(url, ctx);
Handling Clicks on Recommendations
Please note: The method getUrl() should be called only after the “click” event. Calling getUrl() method before the click will cause the SDK to report a false “click” event on the recommendation.
1) When a user clicks on a recommendation, you must call getUrl() first:
// rec is an OBRecommendation object returned in OBRecommendationsResponse
String url = Outbrain.getUrl(recommendation);
Note: For paid recommendations, the returned URL is in paid.outbrain.com re-direct format. For organic recommendations the returned URL is in the standard (original) format. Developers should open the url “as is”, i.e. without any manipulation such as escaping or decoding.
Navigating to the Recommendation
When a user clicks on a recommendation, navigate to it as follows:
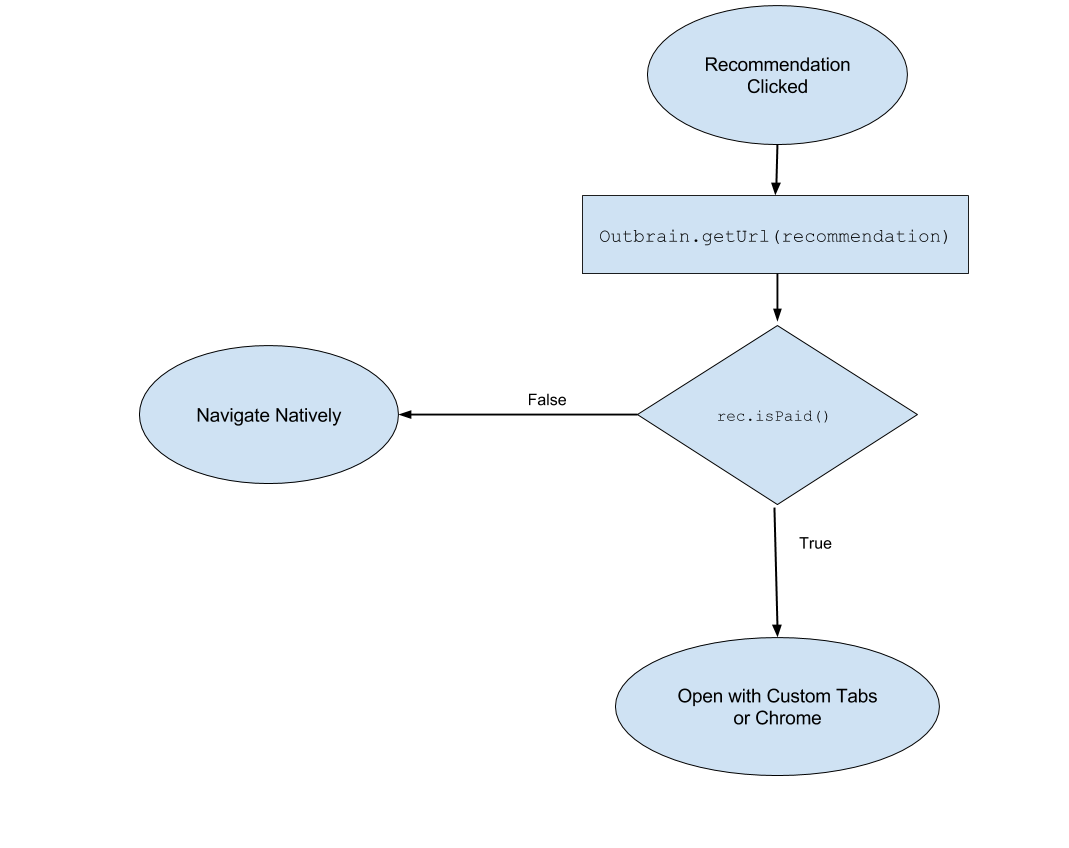
1) Check if it’s a paid rec by calling recommendation.isPaid()
For example:
if (recommendation.isPaid()) {
    handlePaidRecommendation(recommendation);
} else {
    // organic
    handleOrganicRecommendation(recommendation);
}
2) Get the URL of the recommendation by:
// rec is an OBRecommendation object returned in OBRecommendationsResponse
String url = Outbrain.getUrl(recommendation);
For paid recommendations, the returned URL is in paid.outbrain.com re-direct format. For organic recommendations the returned URL is in the standard (original) format. Developers should open the url “as is”, i.e. without any manipulation such as escaping or decoding.
Navigate to Organic Recommendations
Navigate to the organic content using your app’s standard navigation mechanism. You can find an example in the Journal sample app.
Navigate to Paid Recommendations
You should use Custom Tabs or the external Chrome browser to open all paid recommendations.
Using Chrome Custom Tabs
Please follow Android guide for using Chrome Custom Tabs.
Widget Viewability
Currently there is no Viewability solution for Jetpack Compose implementation. Please contact Outbrain representative in order to request this feature.
The latest feature of Outbrain Widget Viewability per-listing measurement allows Outbrain to optimize the recommendations served for the application audience, hence supporting a better user experience and app performance.
Widget Viewability measures for each listing (each recommendation) if the app user has seen it on the device screen or not.
The best way to understand how to implement Viewability is by looking at our Journal Sample App, specifically look at file SwipableCellAdapter.java – you will find a good example for the implementation in method: instantiateItem()
Widget (per-listing) Viewability is implemented via OBFrameLayout (sub-class) of FrameLayout, which you should make sure to include as the “parent container” of the view hierarchy for each recommendation layout inside the widget. In addition, you should call Outbrain.configureViewabilityPerListingFor() to track and report Viewability stats to Outbrain back-end. The arguments should be the OBFrameLayout instance (by using findViewById()) and the corresponding OBRecommendation instance for this specific view.
public static void configureViewabilityPerListingFor(OBFrameLayout outbrainRecContainer, OBRecommendation rec)
How to Integrate Widget Viewability Feature?
Single Rec XML Layout
Make sure to wrap the existing “recommendation view” with OBFrameLayout like so:
<com.outbrain.OBSDK.Viewability.OBFrameLayout
    xmlns:android="http://schemas.android.com/apk/res/android"
    android:layout_width="match_parent"
    android:layout_height="match_parent"
    android:id="@+id/outbrain_rec_container">


   // Original Layout is here

</com.outbrain.OBSDK.Viewability.OBFrameLayout>
App code:
OBFrameLayout outbrainRecContainer = view.findViewById(R.id.outbrain_rec_container);
Outbrain.configureViewabilityPerListingFor(outbrainRecContainer, rec);
(Optional) Viewability Fired Event
Viewability Fired Event is supported from SDK v4.30.5.
Some publishers want to track the real-time "viewablity event" of each recommendation they load. In order to do this they can opt-in to "listen" to Outbrain "event bus", specifically to "Viewability fired" event.
In the Activity where you load Outbrain recommendations, first add the Activity as a listener to Outbrain "event bus":
OutbrainBusProvider.getInstance().register(this);
Next, implement the listener for this specific event (Viewability fired): @Subscribe is critical
@Subscribe
public void receivedViewabilityFiredEvent(OutbrainBusProvider.ViewabilityFiredEvent viewabilityFiredEvent) {
     Log.i("OBSDK_APP", "receivedViewabilityFiredEvent: reqId: " + viewabilityFiredEvent.getRequestId());
     Log.i("OBSDK_APP", "receivedViewabilityFiredEvent: position: " + viewabilityFiredEvent.getPosition());
}